TEST PRINCIPLE
Evaluation of the spreadability of petroleum jelly at 4°C and 21°C using male and female conical probes.
BACKGROUND
Spreadability is the ease at which a sample spreads over a surface in a thin even layer. The measurement of firmness (by penetration) and spreadability are highly correlated. Consequently, the spreadability values of a lipid rich sample will decrease with increasing viscosity of the oil (increasing hardness), resulting in an increased surface tension, giving a feeling of greasiness and tackiness upon application to the skin.
Petroleum jelly is used as an ingredient in skin lotions and cosmetics. It is a semi-solid mixture of hydrocarbons. It falls into the moisturizing category as an occlusive, trapping water in the skin by preventing it from evaporating.
The spreadability of petroleum jelly is an important property measured by using a spreadability fixture consisting of a set of matched male and female Perspex cones, cone sample holder and base holder. The test measures the force required to obtain a given deformation and correlates these values with sensory estimates of spreadability. As the male probe penetrates the female probe the sample is compressed and extruded from the female probe, at an angle. This process simulates the spreading application of the sample on a surface.
METHOD
| Equipment: |
CT3 with 4.5 kg load cell |
|
Fixture Base Table (TA-BT-KIT) |
|
Spreadability Fixture (TA-SF) |
|
TexturePro CT Software |
Settings:
| Test Type: |
Compression |
| Pre-Test Speed: |
1.0 mm/s |
| Test Speed: |
3.0 mm/s |
| Post-Test Speed: |
3.0 mm/s |
| Target Type: |
Distance |
| Target Value: |
13 mm |
| Trigger Force: |
5 g |
Additional Materials: |
Spatula |
|
Roll of tissues |
|
Flat Knife |
SAMPLE PREPARATION
- Fill the four lower cones (female cones) with the sample using a spatula (the fifth cone is left empty as it will be used for alignment, see test procedure). Care must be taken not to overwork or whip the sample.
- Press the sample down so as to eliminate air pockets visible through the Perspex cones.
- Level the surface using a flat knife and leave to set to the specified temperature for a few hours.
PROCEDURE
- Position the base table on the base of the machine.
- Tighten the screws of the base table, but still allow some degree of mobility.
- Fit the base holder on to the base table and lock into position with the screws.
- Insert an empty female cone into the female cone sample holder.
- Attach the male cone to the Load cell.
- Precisely align the male and female cones by lowering the male cone and repositioning the female cone such that the male probe travels into the female cone, until they are almost in contact.
- The screws of the base table can now be tightened.
- Remove the empty female cone from the sample holder and replace it with a prepared sample (see the sample preparations section).
- Position the male probe a few millimeters above the sample. This distance must be applied for all subsequent tests so that the starting point is the same, enabling comparisons between samples.
- Commence the test.
Notes: Precise alignment of the probes is essential in order to avoid instrument overload. The penetration depths should not exceed 90% of the probe height.
Fluctuations on a smooth curve are a result of the compression of air pockets. It is therefore important to minimize air pockets when filling the female cone.
The base holder should not be removed from the base table between tests as this will necessitate realignment of the male and female probes. The female cone can be removed after the test by loosening the screws of the base holder.
For comparison purposes, the test temperature must always be reported in the results.
RESULTS
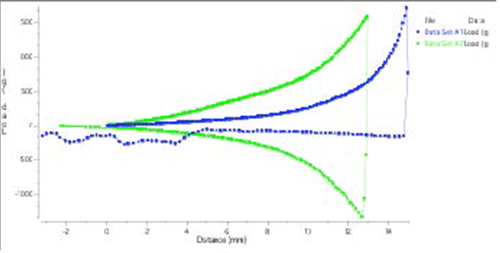
The following graph shows a typical TexturePro CT Plot of the spreadability of petroleum jelly.

Figure I
Figure I shows the spreadability of petroleum jelly tested at 4°C using 21°C.
Data Set #1: Petroleum Jelly at 21°C
Data Set #2: Petroleum Jelly at 4°C

Figure II
Figure II shows load versus distance for the spreadability of a petroleum jelly tested at 4°C and 21°C.
Data Set #1: Petroleum Jelly at 21°C
Data Set #2: Petroleum Jelly at 4°C
OBSERVATIONS
When a trigger force of 5 g has been attained at the sample surface, the male cone proceeds to penetrate the sample at a test-speed of 3 mm/s during which time the penetration force is seen to increase until a maximum at a specified depth (13 mm in this test). The maximum force at penetration depth of 13 mm gives an indication of sample firmness. The higher the force value, the firmer the sample. The area under the positive peak is a measure of hardness work done. Any air pockets in the sample will be indicated by fluctuations in the force of penetration on the graph.
When the male probe withdraws from the sample at the post-test speed of 3 mm/s, a negative peak is generated. The negative peak is a measure of adhesive force; the more negative the value, the more “sticky” the sample. The area under the negative part of the graph is known as the adhesiveness (the energy required to break probe sample contact). The higher the value, the more energy required to break the probe sample contact as the probe withdraws from the sample.
Results for four petroleum jelly samples stored at either 21°C or 4°C give the following mean hardness and hardness work done values:
| Test Number (°C) |
Hardness (g) |
Hardness Work Done (mJ) |
| 4 |
1854.5 ±70.9 |
67.13 ±12.35 |
| 21 |
1001.3 ±93.7 |
27.04 ±9.53 |
>>Download a pdf of this application.